| Warner and Swasey Observatory |
| Case Western Reserve University | Nassau Station |
| Visitors |
|
» Home » News » Gallery » Reference » Weather |
| Science Resources |
|
» NSRT User Interface » Software » Data Archive » Download Data |
|
 |
Reducing FITS Images
A Practical Guide
Introduction
This is a practical guide for reducing the raw FITS data that you get back from the NSRT to make images not unlike those in the image gallery and also suitable for surface and apeture photometry. A guide to the general theory behind CCD reductions can be found here. You need not know about CCD reduction theory to follow this practical guide but it may help explain why we'll be doing some of the things we'll be doing.
Everything we'll be doing here will be simple arithmetic on the data in the images, just addition, subtraction, multiplication, and division. The software you use to do this is up to you. We have suggested some software packages for dealing with FITS data here.
Some Terminology
- Dark Frame
- A CCD exposure of length X seconds taken with the camera shutter closed (no light falling on the chip). The resulting image reveals the total dark current in the chip for an exposure of length X.
- Flat Frame
- A CCD exposure taken of a uniformly illuminated field. The resulting image models imperfections in the telescope and camera optical system.
- Median
- The value in an ordered array of elements for which half the are greater than that value and half are less than that value. For example for the ordered list of values: (-6,10,32,70,88,120,999) the median value is 70 because half the values are greater than 70 and the other half are less.
- Zero Frame
- A CCD exposure of length 0 seconds. The resulting image reveals the permanent background aspect of the CCD's dark current.
Getting Everything You Need
Data from the NSRT can be downloaded in the NSRT download area. See that area for instructions specific to locating and downloading the files you need.
The files you need will be: the raw data from your proposal request, the appropriate zero and/or dark frames, the flat frames for each filter used in your proposal. Sometimes all the dark frames you need will be found with your data. Sometimes you'll find the dark frames you need in the public download area. Sometimes you won't need darks but you'll need the zero frames from the public download area. We'll discuss in the next section which you'll need under which circumstances. With the flats it is important that you get the frames for the appropriate filters. A V Flat does not do you any good if your data was taken with the I filter or no filter at all.
Sometimes combined flats and zeros are made available for the night your data was taken. If you are not picky about combining your own zeros and flats you can download these instead of all those individual flat and zero frames. More about these can be found on the download page.
If you are having trouble locating the files you need in the public download area, obtain the observing log for the night your data was taken. (The observing logs are found in the public download area as well.) The observing log will tell you the names of the files that are the calibration data for the night your proposal was completed.
Trimming
By trimming, we don't mean fancy frilly decorations. We are talking about removing pixels around the edge of the raw data image. Wierd things tend to happen to the pixels on the edge so we just cut them off. (That's why all the combined flats and zeros you might download from us are smaller arrays than the raw image data.) You really aren't loosing aything by trimming the edges so we suggest you do it. We tend to trim one collumn off the right of the CCD, twelve collumns off the left, one row off the top, and five rows off the bottom. (Then bottom left corner is position 0,0 on the CCD.)
Combine Your Zero Frames
Skip this step if you downloaded a combined zero.
Get all of the zero frames for the appropriate night and combine them by taking the median value at each pixel. An average may nine times out of ten by the same as a median however in this case taking the median instead of the average will remove any cosmic ray hits that the CCD may have caught while it was taking a single zero frame. Sometimes the NSRT staff will have already made a combined zero frame, check the download area for details.
Removing Dark Current
A CCD is an electronic device and all electronic devices have random noise in them, no matter how hard we try to remove it. In a CCD the thermal motions of electrons cause a false signal to appear. If we think of the CCD as a bathtub, that we are going to fill with light from a star, then the dark current is the water that is in the bathtub when we start. So to measure just what we put in from the star, we have to know how much water is in the tub to start and just subtract it out later.
The calibration data that gives us information about how much to subtract off are the dark frames and zero frames. The zero frames are exposures zero seconds in length so they measure how much signal is there just by default. The dark frames are the same time length as the exposures to obtain the data but are taken with the shutter closed, so no light is falling on the CCD. The dark frames measure the signal there in the CCD to start off (the amount in the zero frame) plus any amount of signal that may be generated by electrons bouncing around for X amount of time in the CCD.
For a short exposure (less than 10 seconds) the zero frame and the dark frame are statistically identical, so we don't bother to take a dark frame at all. We remove the dark current from our data by subtracting the zero frame from the data frame pixel by pixel.
For a longer exposure, the dark has more signal than the zero in it because the dark is effectively the signal in the zero plus the signal generated by thermal noise over the length of the exposure. (You may notice that the warmer the CCD chip is, the larger this differences is for dark frames of the same length exposure.) In this case, we don't need the zero frame, we instead subtract the dark frame from the data frame pixel by pixel.
If you have a combined flat, do not subtract any dark current from it. For individual flats, check the exposure length in the FITS header (should be 120 seconds for B, V, and R filter flats and 20 seconds for I and E [no filter] flats). Obtain the dark frame of the same exposure length as the flats from the "Dark" directory in the public download area. (Be sure to get the right data for the right night. Check the observing logs to be sure.) Subtract the correct dark frame from the correct flats pixel by pixel. The process of making a combined flat does this for you so do not repeat it on a combined flat.
Combining Your Flat Frames
Skip this step if you have downloaded a combined flat frame.
Next you'll want to take the flat frames you have just removed the dark current from and combine them, taking the median value for each pixel, just like with the zeros. Like with the zero frames, taking the median rather than the average will eliminated cosmic rays hits in individual exposures.
Flatten Your Data
Every effort is made to make astronomical optics perfect, however nothing is perfect. Imperfections in the optical system of the telescope and camera lead to variations in response across the telescope field. To solve this we flatten the field.
To flatten the field take the frames of your data (which you have removed the dark current from) and divide into them the combined flat (which you have made or downloaded). Then multiply this result by the average value of a pixel in the combined flat. It is crucial that the data and the combined flat haven been taken with the same filter, otherwise you are just making your data worse.
Let's See That Again
First remove the dark current. | |
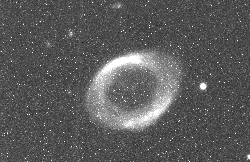 -minus- 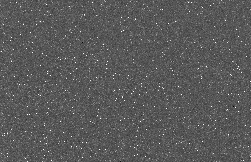 | Results in: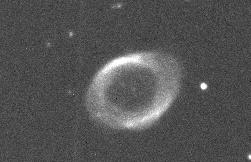 |
Then flatten the image.
 /divided by/  | Results in: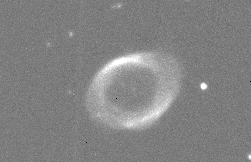 |
Now that you have reduced your data there are a myriad of other things you can do to make pretty pictures or gather precise scientific data. These are just the basics, we leave the fancy stuff up to you.